 进城务工人员小梅
下面,以STS(Spring Tool Suite)为例介绍Mybatis Generator插件的安装与使用。
一、Mybatis Generator插件的安装
点击菜单,“Help–>Eclipse Marketplace”打开市场,并在其中搜索“mybatis”,找到“Mybatis Generator”并完成安装(要离线安装的话请自行百度吧):
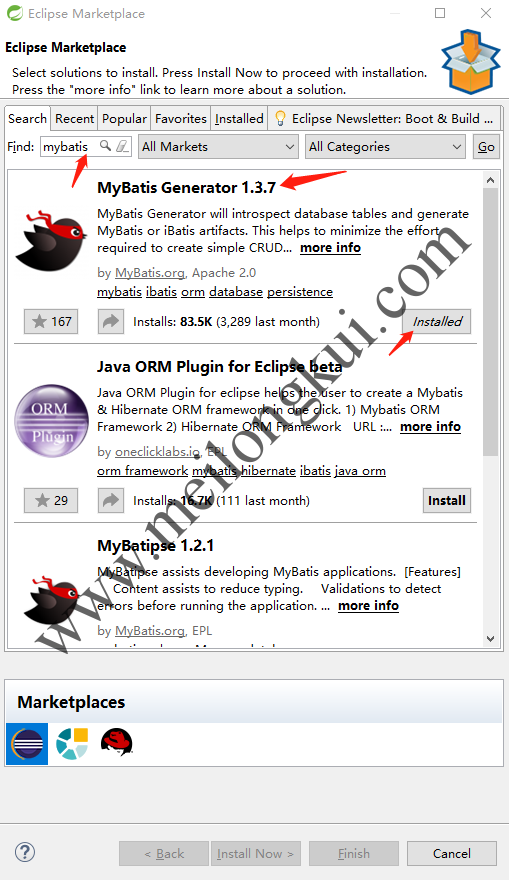
通过Eclipse Market安装Mybatis Generator插件
二、Mybatis Generator插件的使用(生成配置文件)
点击菜单,“New–>Other”,找到“Mybatis Generator Configuration File”:
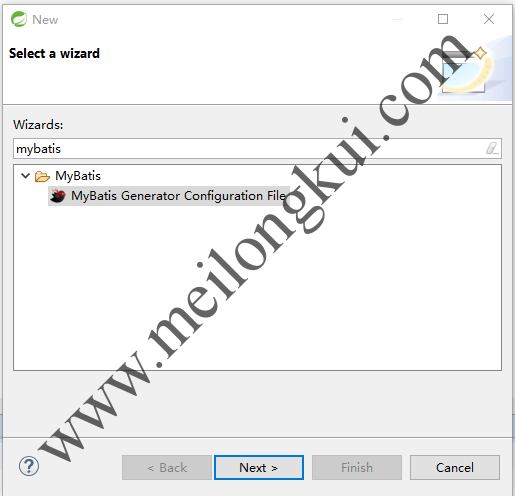
选择Mybatis Generator Configuration File
点击Next,选择将文件保存到哪个项目的哪个路径中;点击Finish后就会在相应项目的路径下生成配置文件(默认的是generatorConfig.xml):
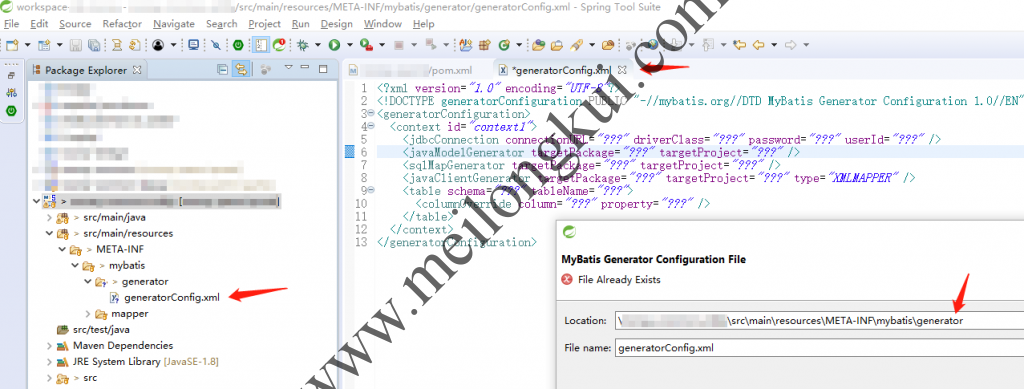
生成Mybatis Generator Configuration File
注意:generatorConfig.xml所在的项目中需要包含访问数据库相关的jar包(如JDBC Driver类依赖的jar包)。
三、Mybatis Generator插件的使用(修改配置文件)
接下来,我们需要根据具体的情况修改配置文件:
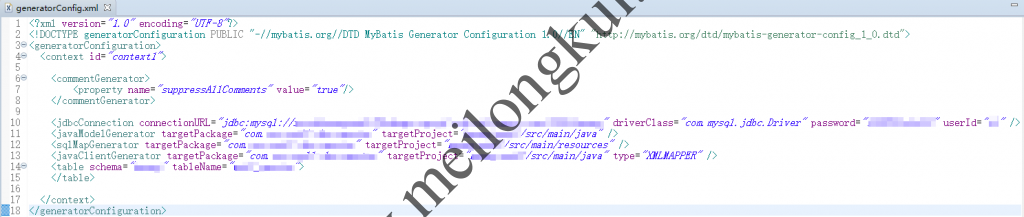
修改Mybatis Generator Configuration File
需要注意,targetProject所指向的路径必须是已存在的,否则会报WARNING并且不会生成代码:
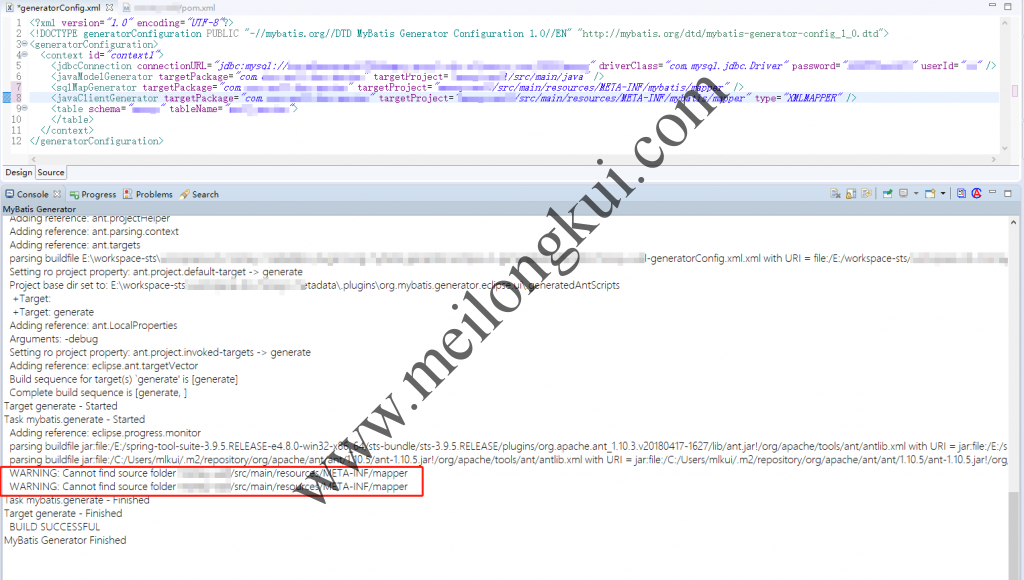
targetProject的路径需要是已存在的
以下是对该配置文件一个比较全的描述,我们通常只需要关注常用的一些配置即可;如果要具体地学习,可以参见官网链接http://www.mybatis.org/generator/configreference/xmlconfig.html。
|
1 2 3 4 5 6 7 8 9 10 11 12 13 14 15 16 17 18 19 20 21 22 23 24 25 26 27 28 29 30 31 32 33 34 35 36 37 38 39 40 41 42 43 44 45 46 47 48 49 50 51 52 53 54 55 56 57 58 59 60 61 62 63 64 65 66 67 68 69 70 71 72 73 74 75 76 77 78 79 80 81 82 83 84 85 86 87 88 89 90 91 92 93 94 95 96 97 98 99 100 101 102 103 104 105 106 107 108 109 110 111 112 113 114 115 116 117 118 119 120 121 122 123 124 125 126 127 128 129 130 131 132 133 134 135 136 137 138 139 140 141 142 143 144 145 146 147 148 149 150 151 152 153 154 155 156 157 158 159 160 161 162 163 164 165 166 167 168 169 170 171 172 173 174 175 176 177 178 179 180 181 182 183 184 185 186 187 188 189 190 191 192 193 194 195 196 197 198 199 200 201 202 203 204 205 206 207 208 209 210 211 212 213 214 215 216 217 218 219 220 221 222 223 224 225 226 227 228 229 230 231 232 233 234 235 236 237 238 239 240 241 242 243 244 245 246 247 248 249 250 251 252 253 254 255 256 257 258 259 260 261 262 263 264 265 266 267 268 269 270 271 272 273 274 275 276 277 278 279 280 281 |
<?xml version="1.0" encoding="UTF-8"?> <!DOCTYPE generatorConfiguration PUBLIC "-//mybatis.org//DTD MyBatis Generator Configuration 1.0//EN" "http://mybatis.org/dtd/mybatis-generator-config_1_0.dtd"> <!-- 配置生成器 --> <generatorConfiguration> <!-- 可以用于加载配置项或者配置文件,在整个配置文件中就可以使用${propertyKey}的方式来引用配置项 resource:配置资源加载地址,使用resource,MBG从classpath开始找,比如com/myproject/generatorConfig.properties url:配置资源加载地质,使用URL的方式,比如file:///C:/myfolder/generatorConfig.properties. 注意,两个属性只能选址一个; 另外,如果使用了mybatis-generator-maven-plugin,那么在pom.xml中定义的properties都可以直接在generatorConfig.xml中使用 <properties resource="" url="" /> --> <!-- 在MBG工作的时候,需要额外加载的依赖包 location属性指明加载jar/zip包的全路径 <classPathEntry location="/Program Files/IBM/SQLLIB/java/db2java.zip" /> --> <!-- context:生成一组对象的环境 id:必选,上下文id,用于在生成错误时提示 defaultModelType:指定生成对象的样式 1,conditional:类似hierarchical; 2,flat:所有内容(主键,blob)等全部生成在一个对象中; 3,hierarchical:主键生成一个XXKey对象(key class),Blob等单独生成一个对象,其他简单属性在一个对象中(record class) targetRuntime: 1,MyBatis3:默认的值,生成基于MyBatis3.x以上版本的内容,包括XXXBySample; 2,MyBatis3Simple:类似MyBatis3,只是不生成XXXBySample; introspectedColumnImpl:类全限定名,用于扩展MBG --> <context id="mysql" defaultModelType="hierarchical" targetRuntime="MyBatis3Simple" > <!-- 自动识别数据库关键字,默认false,如果设置为true,根据SqlReservedWords中定义的关键字列表; 一般保留默认值,遇到数据库关键字(Java关键字),使用columnOverride覆盖 --> <property name="autoDelimitKeywords" value="false"/> <!-- 生成的Java文件的编码 --> <property name="javaFileEncoding" value="UTF-8"/> <!-- 格式化java代码 --> <property name="javaFormatter" value="org.mybatis.generator.api.dom.DefaultJavaFormatter"/> <!-- 格式化XML代码 --> <property name="xmlFormatter" value="org.mybatis.generator.api.dom.DefaultXmlFormatter"/> <!-- beginningDelimiter和endingDelimiter:指明数据库的用于标记数据库对象名的符号,比如ORACLE就是双引号,MYSQL默认是`反引号; --> <property name="beginningDelimiter" value="`"/> <property name="endingDelimiter" value="`"/> <!-- 必须要有的,使用这个配置链接数据库 @TODO:是否可以扩展 --> <jdbcConnection driverClass="com.mysql.jdbc.Driver" connectionURL="jdbc:mysql:///pss" userId="root" password="admin"> <!-- 这里面可以设置property属性,每一个property属性都设置到配置的Driver上 --> </jdbcConnection> <!-- java类型处理器 用于处理DB中的类型到Java中的类型,默认使用JavaTypeResolverDefaultImpl; 注意一点,默认会先尝试使用Integer,Long,Short等来对应DECIMAL和NUMERIC数据类型; --> <javaTypeResolver type="org.mybatis.generator.internal.types.JavaTypeResolverDefaultImpl"> <!-- true:使用BigDecimal对应DECIMAL和 NUMERIC数据类型 false:默认, scale>0;length>18:使用BigDecimal; scale=0;length[10,18]:使用Long; scale=0;length[5,9]:使用Integer; scale=0;length<5:使用Short; --> <property name="forceBigDecimals" value="false"/> </javaTypeResolver> <!-- java模型创建器,是必须要的元素 负责:1,key类(见context的defaultModelType);2,java类;3,查询类 targetPackage:生成的类要放的包,真实的包受enableSubPackages属性控制; targetProject:目标项目,指定一个存在的目录下,生成的内容会放到指定目录中,如果目录不存在,MBG不会自动建目录 --> <javaModelGenerator targetPackage="com.example.mybatis.domain" targetProject="src/main/java"> <!-- for MyBatis3/MyBatis3Simple 自动为每一个生成的类创建一个构造方法,构造方法包含了所有的field;而不是使用setter; --> <property name="constructorBased" value="false"/> <!-- 在targetPackage的基础上,根据数据库的schema再生成一层package,最终生成的类放在这个package下,默认为false --> <property name="enableSubPackages" value="true"/> <!-- for MyBatis3 / MyBatis3Simple 是否创建一个不可变的类,如果为true, 那么MBG会创建一个没有setter方法的类,取而代之的是类似constructorBased的类 --> <property name="immutable" value="false"/> <!-- 设置一个根对象, 如果设置了这个根对象,那么生成的keyClass或者recordClass会继承这个类;在Table的rootClass属性中可以覆盖该选项 注意:如果在key class或者record class中有root class相同的属性,MBG就不会重新生成这些属性了,包括: 1,属性名相同,类型相同,有相同的getter/setter方法; --> <property name="rootClass" value="com.example.mybatis.domain.BaseDomain"/> <!-- 设置是否在getter方法中,对String类型字段调用trim()方法 --> <property name="trimStrings" value="true"/> </javaModelGenerator> <!-- 生成SQL map的XML文件生成器, 注意,在Mybatis3之后,我们可以使用mapper.xml文件+Mapper接口(或者不用mapper接口), 或者只使用Mapper接口+Annotation,所以,如果 javaClientGenerator配置中配置了需要生成XML的话,这个元素就必须配置 targetPackage/targetProject:同javaModelGenerator --> <sqlMapGenerator targetPackage="com.example.mybatis.mapper" targetProject="src/main/resources"> <!-- 在targetPackage的基础上,根据数据库的schema再生成一层package,最终生成的类放在这个package下,默认为false --> <property name="enableSubPackages" value="true"/> </sqlMapGenerator> <!-- 对于mybatis来说,即生成Mapper接口,注意,如果没有配置该元素,那么默认不会生成Mapper接口 targetPackage/targetProject:同javaModelGenerator type:选择怎么生成mapper接口(在MyBatis3/MyBatis3Simple下): 1,ANNOTATEDMAPPER:会生成使用Mapper接口+Annotation的方式创建(SQL生成在annotation中),不会生成对应的XML; 2,MIXEDMAPPER:使用混合配置,会生成Mapper接口,并适当添加合适的Annotation,但是XML会生成在XML中; 3,XMLMAPPER:会生成Mapper接口,接口完全依赖XML; 注意,如果context是MyBatis3Simple:只支持ANNOTATEDMAPPER和XMLMAPPER --> <javaClientGenerator targetPackage="com.example.mybatis.mapper" type="ANNOTATEDMAPPER" targetProject="src/main/java"> <!-- 在targetPackage的基础上,根据数据库的schema再生成一层package,最终生成的类放在这个package下,默认为false --> <property name="enableSubPackages" value="true"/> <!-- 可以为所有生成的接口添加一个父接口,但是MBG只负责生成,不负责检查 <property name="rootInterface" value=""/> --> </javaClientGenerator> <!-- 选择一个table来生成相关文件,可以有一个或多个table,必须要有table元素 选择的table会生成一下文件: 1,SQL map文件 2,生成一个主键类; 3,除了BLOB和主键的其他字段的类; 4,包含BLOB的类; 5,一个用户生成动态查询的条件类(selectByExample, deleteByExample),可选; 6,Mapper接口(可选) tableName(必要):要生成对象的表名; 注意:大小写敏感问题。正常情况下,MBG会自动的去识别数据库标识符的大小写敏感度,在一般情况下,MBG会 根据设置的schema,catalog或tablename去查询数据表,按照下面的流程: 1,如果schema,catalog或tablename中有空格,那么设置的是什么格式,就精确的使用指定的大小写格式去查询; 2,否则,如果数据库的标识符使用大写的,那么MBG自动把表名变成大写再查找; 3,否则,如果数据库的标识符使用小写的,那么MBG自动把表名变成小写再查找; 4,否则,使用指定的大小写格式查询; 另外的,如果在创建表的时候,使用的""把数据库对象规定大小写,就算数据库标识符是使用的大写,在这种情况下也会使用给定的大小写来创建表名; 这个时候,请设置delimitIdentifiers="true"即可保留大小写格式; 可选: 1,schema:数据库的schema; 2,catalog:数据库的catalog; 3,alias:为数据表设置的别名,如果设置了alias,那么生成的所有的SELECT SQL语句中,列名会变成:alias_actualColumnName 4,domainObjectName:生成的domain类的名字,如果不设置,直接使用表名作为domain类的名字;可以设置为somepck.domainName,那么会自动把domainName类再放到somepck包里面; 5,enableInsert(默认true):指定是否生成insert语句; 6,enableSelectByPrimaryKey(默认true):指定是否生成按照主键查询对象的语句(就是getById或get); 7,enableSelectByExample(默认true):MyBatis3Simple为false,指定是否生成动态查询语句; 8,enableUpdateByPrimaryKey(默认true):指定是否生成按照主键修改对象的语句(即update); 9,enableDeleteByPrimaryKey(默认true):指定是否生成按照主键删除对象的语句(即delete); 10,enableDeleteByExample(默认true):MyBatis3Simple为false,指定是否生成动态删除语句; 11,enableCountByExample(默认true):MyBatis3Simple为false,指定是否生成动态查询总条数语句(用于分页的总条数查询); 12,enableUpdateByExample(默认true):MyBatis3Simple为false,指定是否生成动态修改语句(只修改对象中不为空的属性); 13,modelType:参考context元素的defaultModelType,相当于覆盖; 14,delimitIdentifiers:参考tableName的解释,注意,默认的delimitIdentifiers是双引号,如果类似MYSQL这样的数据库,使用的是`(反引号,那么还需要设置context的beginningDelimiter和endingDelimiter属性) 15,delimitAllColumns:设置是否所有生成的SQL中的列名都使用标识符引起来。默认为false,delimitIdentifiers参考context的属性 注意,table里面很多参数都是对javaModelGenerator,context等元素的默认属性的一个复写; --> <table tableName="userinfo" > <!-- 参考 javaModelGenerator 的 constructorBased属性--> <property name="constructorBased" value="false"/> <!-- 默认为false,如果设置为true,在生成的SQL中,table名字不会加上catalog或schema; --> <property name="ignoreQualifiersAtRuntime" value="false"/> <!-- 参考 javaModelGenerator 的 immutable 属性 --> <property name="immutable" value="false"/> <!-- 指定是否只生成domain类,如果设置为true,只生成domain类,如果还配置了sqlMapGenerator,那么在mapper XML文件中,只生成resultMap元素 --> <property name="modelOnly" value="false"/> <!-- 参考 javaModelGenerator 的 rootClass 属性 <property name="rootClass" value=""/> --> <!-- 参考javaClientGenerator 的 rootInterface 属性 <property name="rootInterface" value=""/> --> <!-- 如果设置了runtimeCatalog,那么在生成的SQL中,使用该指定的catalog,而不是table元素上的catalog <property name="runtimeCatalog" value=""/> --> <!-- 如果设置了runtimeSchema,那么在生成的SQL中,使用该指定的schema,而不是table元素上的schema <property name="runtimeSchema" value=""/> --> <!-- 如果设置了runtimeTableName,那么在生成的SQL中,使用该指定的tablename,而不是table元素上的tablename <property name="runtimeTableName" value=""/> --> <!-- 注意,该属性只针对MyBatis3Simple有用; 如果选择的runtime是MyBatis3Simple,那么会生成一个SelectAll方法,如果指定了selectAllOrderByClause,那么会在该SQL中添加指定的这个order条件; --> <property name="selectAllOrderByClause" value="age desc,username asc"/> <!-- 如果设置为true,生成的model类会直接使用column本身的名字,而不会再使用驼峰命名方法,比如BORN_DATE,生成的属性名字就是BORN_DATE,而不会是bornDate --> <property name="useActualColumnNames" value="false"/> <!-- generatedKey用于生成生成主键的方法, 如果设置了该元素,MBG会在生成的<insert>元素中生成一条正确的<selectKey>元素,该元素可选 column:主键的列名; sqlStatement:要生成的selectKey语句,有以下可选项: Cloudscape:相当于selectKey的SQL为: VALUES IDENTITY_VAL_LOCAL() DB2 :相当于selectKey的SQL为: VALUES IDENTITY_VAL_LOCAL() DB2_MF :相当于selectKey的SQL为:SELECT IDENTITY_VAL_LOCAL() FROM SYSIBM.SYSDUMMY1 Derby :相当于selectKey的SQL为:VALUES IDENTITY_VAL_LOCAL() HSQLDB :相当于selectKey的SQL为:CALL IDENTITY() Informix :相当于selectKey的SQL为:select dbinfo('sqlca.sqlerrd1') from systables where tabid=1 MySql :相当于selectKey的SQL为:SELECT LAST_INSERT_ID() SqlServer :相当于selectKey的SQL为:SELECT SCOPE_IDENTITY() SYBASE :相当于selectKey的SQL为:SELECT @@IDENTITY JDBC :相当于在生成的insert元素上添加useGeneratedKeys="true"和keyProperty属性 <generatedKey column="" sqlStatement=""/> --> <!-- 该元素会在根据表中列名计算对象属性名之前先重命名列名,非常适合用于表中的列都有公用的前缀字符串的时候, 比如列名为:CUST_ID,CUST_NAME,CUST_EMAIL,CUST_ADDRESS等; 那么就可以设置searchString为"^CUST_",并使用空白替换,那么生成的Customer对象中的属性名称就不是 custId,custName等,而是先被替换为ID,NAME,EMAIL,然后变成属性:id,name,email; 注意,MBG是使用java.util.regex.Matcher.replaceAll来替换searchString和replaceString的, 如果使用了columnOverride元素,该属性无效; <columnRenamingRule searchString="" replaceString=""/> --> <!-- 用来修改表中某个列的属性,MBG会使用修改后的列来生成domain的属性; column:要重新设置的列名; 注意,一个table元素中可以有多个columnOverride元素哈~ --> <columnOverride column="username"> <!-- 使用property属性来指定列要生成的属性名称 --> <property name="property" value="userName"/> <!-- javaType用于指定生成的domain的属性类型,使用类型的全限定名 <property name="javaType" value=""/> --> <!-- jdbcType用于指定该列的JDBC类型 <property name="jdbcType" value=""/> --> <!-- typeHandler 用于指定该列使用到的TypeHandler,如果要指定,配置类型处理器的全限定名 注意,mybatis中,不会生成到mybatis-config.xml中的typeHandler 只会生成类似:where id = #{id,jdbcType=BIGINT,typeHandler=com.example.mybatis.MyTypeHandler}的参数描述 <property name="jdbcType" value=""/> --> <!-- 参考table元素的delimitAllColumns配置,默认为false <property name="delimitedColumnName" value=""/> --> </columnOverride> <!-- ignoreColumn设置一个MGB忽略的列,如果设置了改列,那么在生成的domain中,生成的SQL中,都不会有该列出现 column:指定要忽略的列的名字; delimitedColumnName:参考table元素的delimitAllColumns配置,默认为false 注意,一个table元素中可以有多个ignoreColumn元素 <ignoreColumn column="deptId" delimitedColumnName=""/> --> </table> </context> </generatorConfiguration> |
四、Mybatis Generator插件的使用(生成代码)
在generatorConfig.xml上点击右键,然后“Run As–>Run MyBatis Generator”生成代码:
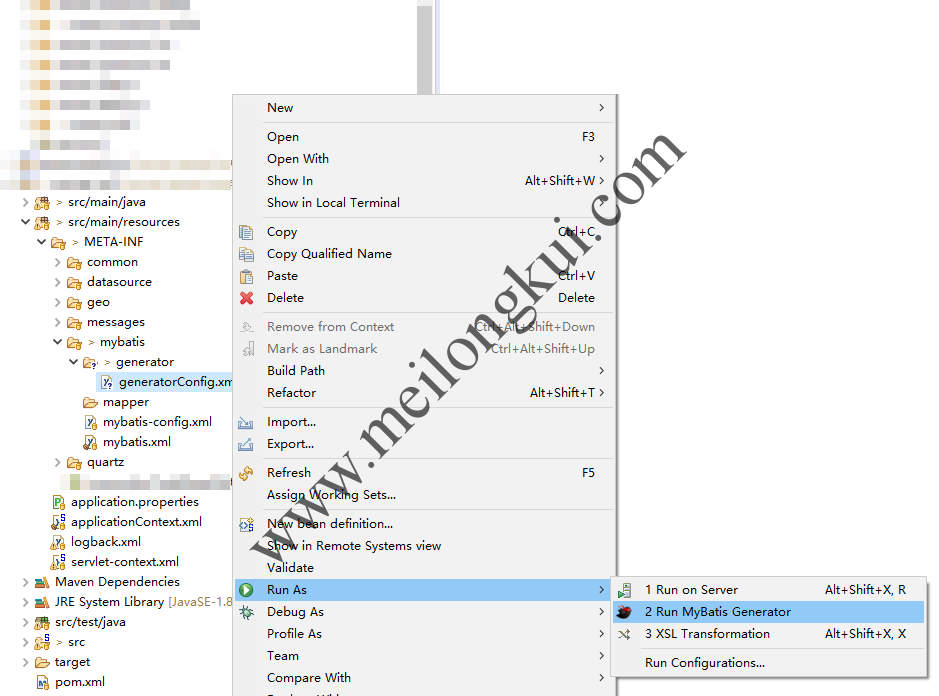
使用Mybatis Generator生成代码
注意观察console的日志输出,若无问题,就可以在配置的路径下看到生成的Java代码及Mapper文件了。
参考资料:
1、http://www.mybatis.org/generator/configreference/xmlconfig.html
2、《Mybatis Generator最完整配置详解》,https://www.jianshu.com/p/e09d2370b796
转载时请保留出处,违法转载追究到底:进城务工人员小梅 » Mybatis Generator插件的安装与使用